Thursday, December 28, 2006

Computer Desk: Part III - Drawers

desk drawers

Elizabeth and I worked on the desk yesterday and will do a little more today. She started painting some of the sliding shelves that the components will sit on and the center section that will house the keyboard drawer. Once these are done and the center section is installed, I can work on the doors and then the top so it finally seems like I'm getting somewhere.

In the mean time, I built a couple of the drawers. I'm really happy with how they turned out. You can see how they look in the picture though they will actually go at the top instead of the bottom of the cabinet.

Friday, December 15, 2006

Site Feed Issues

I recently 'upgraded' to Blogger in Beta. It has tons of great new features most of which are completely useless if you publish to your own website like I do. That doesn't bother me though because I wasn't looking for new features, I was just upgrading because I figured it needed to be done at some point. What does bother me though is that there are site feed issues that have appeared.

First, Blogger in Beta organizes your posts in the order of their update date instead of their publish date. This means that correcting an old spelling mistake or other minor issue brings the post back to the top of the queue. This is why Broken Garage Door appears before Computer Desk: Part II - 'Oops!' in the list. Second, I use FeedBurner for my feed and since the Blogger in Beta switch, subscribing to the feed using a Google reader shows the posts in an unexplainable order. I am working on the problem (including this test post) and will hopefully have the problem fixed shortly.

Thursday, November 30, 2006

Computer Desk: Part II - 'Oops!'

Progress has been slow on the desk lately and I recently made it harder on myself. First, E has of course done her job of painting the bases and they look great. I've started working on the drawers, shelves, and the center section that will hide the keyboard behind a fake drawer. It took me a long time to decide how I wanted to do everything. I finally, built the center section though and E painted it and then I dropped it. Oops! Okay, I'll admit that the first word out of my mouth was not quite as polite as 'oops.' Anyway, I pretty much have to start over and am having difficulty finding the motivation to do work I've already done but at least the planning is done, right?

Tuesday, November 07, 2006

Broken Garage Door

falling garage door

Today I was surprised with an emergency project. When I got home from work, I pulled into the garage as usual and then pushed the button to close the garage door. I was rewarded with some loud grinding and crashing and the garage door beginning to fall off of the track. This is not exactly what I was hoping for especially with my car in the garage. Fortunately, Elizabeth's car was not there or it probably would have been hit by the falling door.

I managed to get my car out, lower the door, and do some repairs but I think I'm going to have to call a pro on this one. I got the wheels back on (two fell off when it came off the track) and the door back in the track. I also straightened out some of the bent track and the door itself but some of the parts are probably going to need replacing. The following pictures show the "fixed" condition. It was considerably worse.

bent trackbent support

Saturday, October 28, 2006

Yard Work

Okay, so yard work is not particularly exciting but since I haven't posted in a while, I thought I would let you know I haven't been completely idle. E and I spent about half the day today doing yard work in the front. She weeded the flower bed and cut the plants back and I pruned crepe myrtles, bushes, and trees. It was a long day and we filled up 2 trash cans and 4 very large trash bags. Tomorrow, we need to do more of the same in the back yard and then actually mow.

If you've been to our house recently, you know that our plants in the front were all starting to merge into some kind of mutant, house eating, multicolored (shades of green) beast. Today, we tamed that beast!!! You'll definitely see the difference when you come to see us! Speaking of mutants, E found a frog buried under some plants. It had taken on the color of the dirt and she swears that it has always lived in that one spot and just eaten bugs that come by. She said that it seemed to have really weak legs and couldn't even jump. Crazy! (I'll leave it up to you to decide whether I'm referring to the frog or Elizabeth.)

Sunday, October 01, 2006

Computer Desk: Part I

So, I've mentioned this desk that I am building for the breakfast nook in the kitchen several times and I am finally going to fill in some details on the project. Since we moved in, we've had a table and chairs set in the breakfast nook, and it has been nice to have as an extra place to sit and eat. However, when we remodeled the kitchen and put in the new countertops, we added seating at the island so we can sit there and eat. This was partly because we wanted to get rid of the table and put a desk there instead. It is a nice spot for a desk because of the window plus moving the computer and accessories out of the third bedroom will free up that room for other purposes.

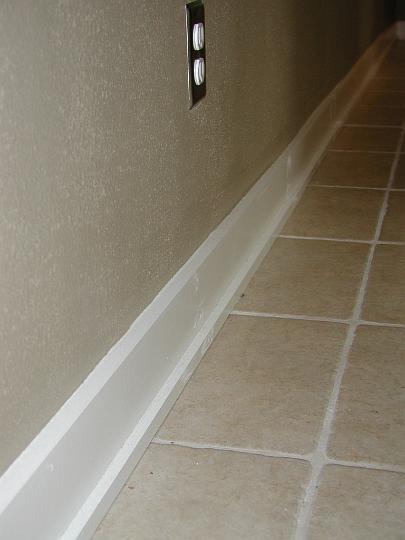
Since we are trying to store a lot of stuff in the desk, I am using the entire 95" width of the nook and I am going to make it a built-in. Actually, it will not be attached to the walls or anything so it could come out, but I am going to match the base molding and do a few other things to make it look like part of the house. We will probably leave it when we move and I want it to look good so that it adds value to the house.

desk in work

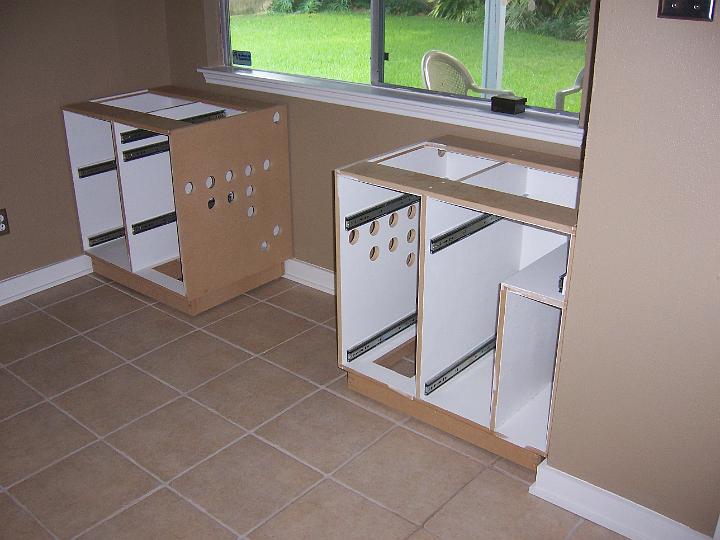
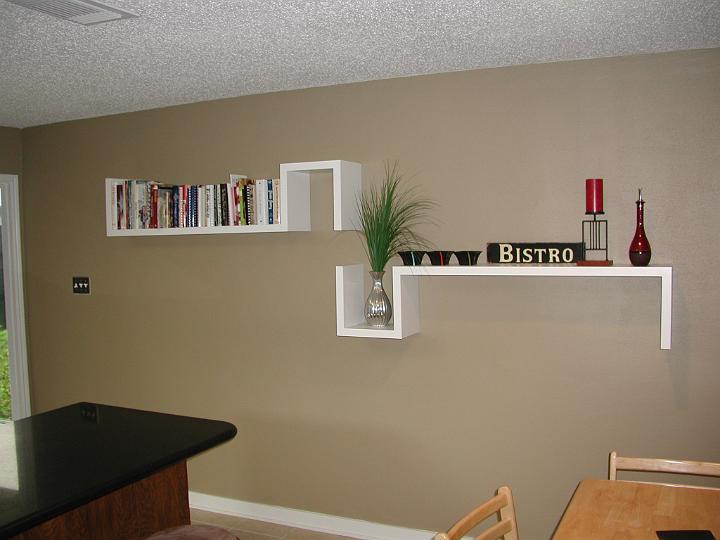
Anyway, here you see where I am at this point. Obviously, neither piece is actually finished because they need to be painted and I need to add the doors but you can get the idea. Each compartment has its purpose and it was all designed around the things we want to put in the desk (computer, printer, scanner, shredder, files, subwoofer, etc.). As always, there are a couple more pics in the house album.

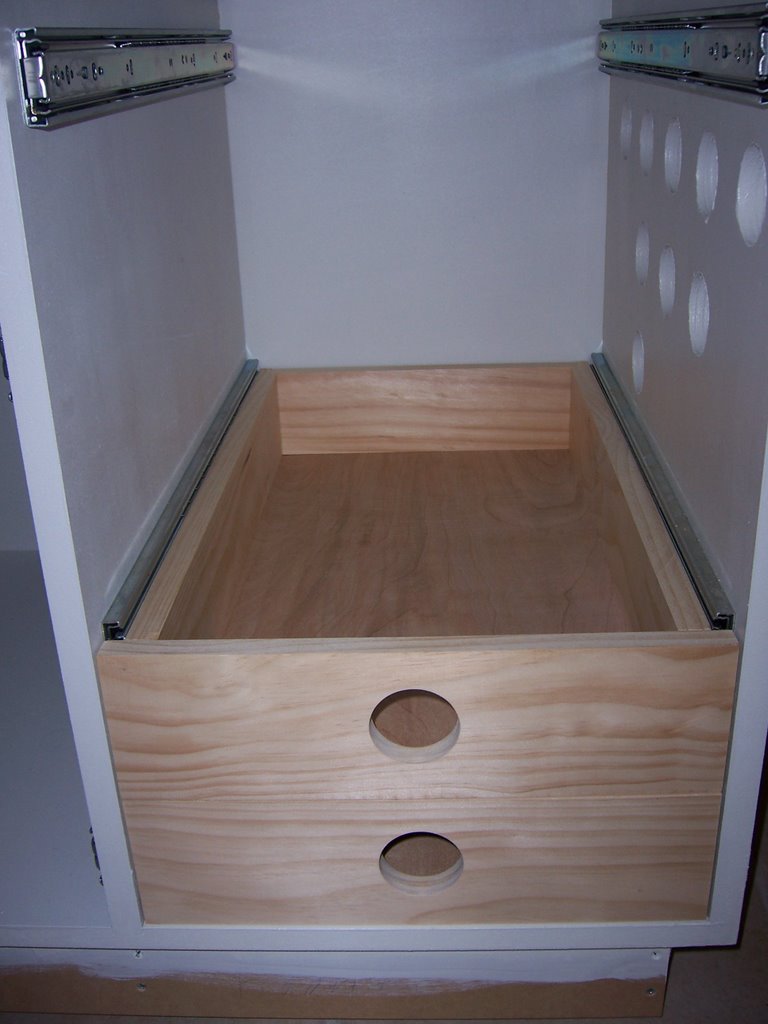
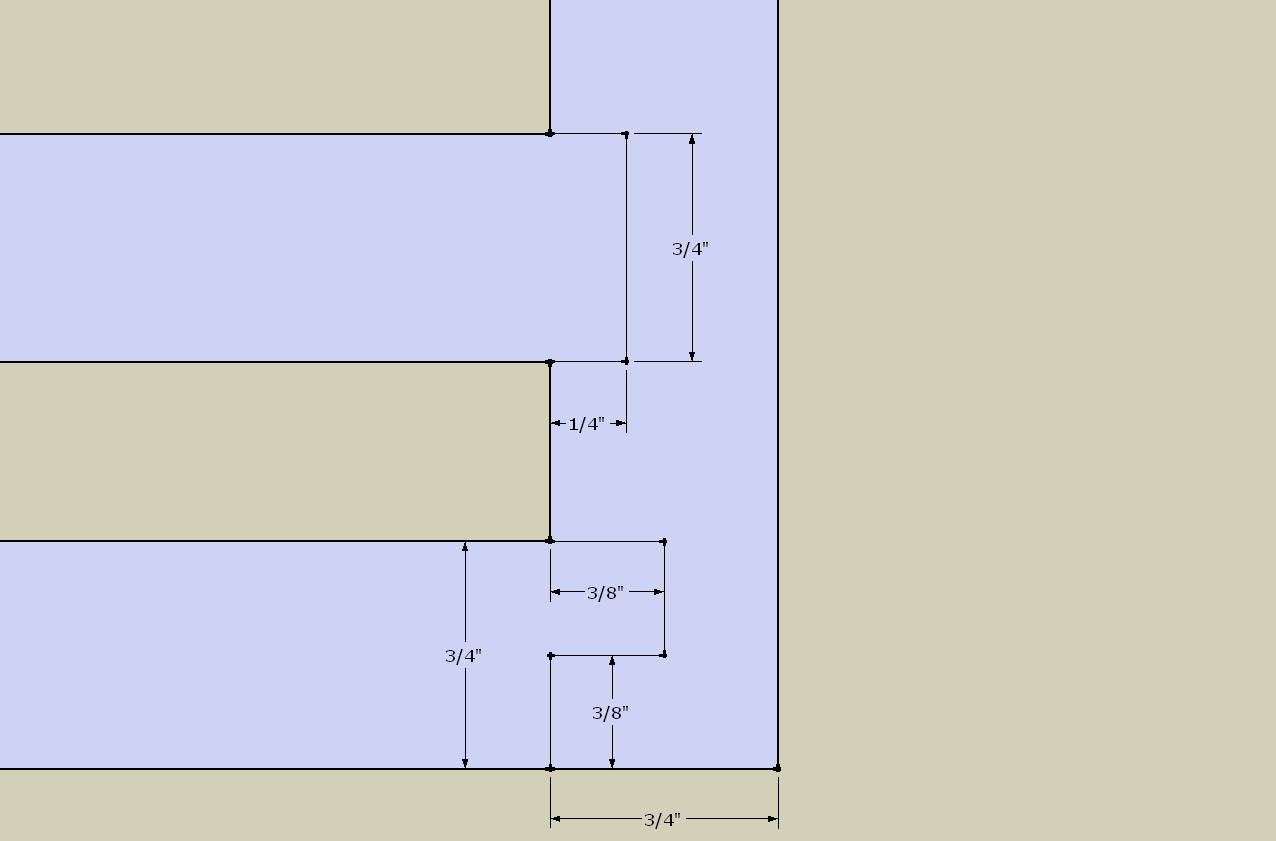
This is all made from 3/4" MDF held together with glue and a few screws. I used the joinery shown in this picture (created in Google Sketchup). Both of these joints add structural stability and increase glue surface area. I got all the hardware including the drawer slides shown from Rockler.

The next step is to add the top. This should be pretty interesting because the walls are not square and aren't all that straight either so I'm going to try to make a piece fit. Then I have to build all of the drawers and the center piece which will be a faux drawer hiding a slide out keyboard. Stay tuned and I'll do my best to keep this up-to-date with my progress. Unfortunately, I probably won't work on it much for about 3 weeks so I doubt there will be any updates until then.

Sunday, September 17, 2006

Kitchen Shelves

S wall shelves

What do you do with a really long blank wall in a kitchen? How about wall shelves. But not just any wall shelves...fancy, large, funky, creative, 'S' shaped wall shelves. Though not a completely original design, these shelves are yet another brilliantly functional and attractive design from my lovely wife.

As far as design, I think the pictures say all there is to say and, in fact, there is not that much to say about the implementation either. The shelves are made from glued up 3/4" MDF to produce a thickness of 1 1/2". The total length is 5ft and stud positioning was taken into account during design to guarantee plenty of support for the relative heft of that much MDF. These shelves are very secure due to the mounting method I chose. Basically, I created a copy of the shelves out of solid 1x2 wood and fastened the copy to the studs with screws. The shelf pieces were dadoed to fit over the 1x2 copy and a couple of screws through the top of the shelf attach them together.

This is all part of a master plan that will include some more decorative work on the wall and a wine rack. I'll be working on that after I finish the desk. Speaking of the desk, for the first time I will try to keep the blog up-to-date with progress instead of just giving updates upon completion so look forward to that.

Sunday, September 03, 2006

Kitchen Makeover: Part III

complete cooking area

It is easy to forget exactly how much work we have done in the kitchen until I start trying to document it all. We left off with the countertops having just been put in. After that, we had professional tile layers come in and put up the backsplash. We, also, added knobs and handles to the cabinetry and painted the walls in a tan color. With these changes, the cooking area of the kitchen was mostly complete.

Next, attention was focused on the long wall with the wayne's coat. We pulled the wayne's coat off but it had been attached with liquid nails so it tore up the drywall. After about a week of E and I both trying to fix the dry wall and match the existing texture, we finally gave up and had painters come in. They were smarter and smoothed the whole wall and then retextured instead of trying to match the existing texture.

baseboard

Lastly, we put in new baseboard. Because the tile had been installed after the wayne's coat, the baseboard had to be pretty thick to cover the gap. As you can see, we just used a very simple design. We also, put it under the cabinets and just the small piece of baseboard around the back side of the island. Putting it under the cabinets meant it needed to go in front of the dishwasher base. This is a problem because the dishwasher sticks out a little and because I didn't want to have to remove the baseboard to get to the dishwasher. I solved this by attaching a piece of baseboard to the dishwasher with magnets. It stands out a little , but is hardly noticeable in person.

That pretty much wraps up the major changes to the kitchen itself. There are a lot more pictures in the house album. I've since added some shelves to the long wall that I'll write about next and I am currently building a desk to go in the breakfast nook. There will be plenty of time to write about that because there is still much left to do.

Saturday, August 19, 2006

Kitchen Makeover: Part II

kitchen before

Elizabeth and I have done a lot of work on our kitchen. Like I said in Part I, we really didn't like the kitchen when we moved in so we started making changes immediately. However, there was some fairly significant design changes to make, so we started off slow (again, see Part I). I am now going to start talking about the major changes. Unfortunately, we did not document the work very well in pictures but at least you can see the results. As a reminder, I've put in a before pic.

undercabinet light

The first thing E and I did was refinish all of the cabinets, doors, and drawers. We wanted them to be darker than they were so we just did a light sanding job and then put a couple of coats of a darker stain on. Next, Elizabeth's dad, Kim, helped me to tear out the old countertops, all of the old tile, and the drywall that was behind the tile. He and I then reinforced some of the joinery in the wall with some 2x4 and installed some undercounter lighting that I rewired with appropriate wire so that I could run it through the wall and connect it to the existing switch for the sink light. Lastly, we installed tile backerboard for the new tile that would be installed.

E and I then had Silestone countertops put in along with a new sink, faucet, and cooktop we had purchased. Of course, I then had to figure out how to adjust the plumbing to work with the new sink layout and I had to hook the new cooktop up to the gas line that we had run. We also had a professional do the electric conversion from a hardwired 240V to a 120V plug for the new cooktop. Here are some pictures of the work and results and there are more in the House Album.

new sinkplumbing
new cooktopcooktop hookup
kitchen in work

Friday, August 18, 2006

Reindeer

Sorry it's been so long since I posted. I'm sure there are hundreds of people that have been disappointed when they checked in every day. ;-) Anyway, the next project that E had me do was some reindeer for Christmas decorations.

reindeer

One of her coworkers has some like these and she stole the idea from her. These were pretty simple to make. I just used the jig saw to cut out the patterns and then sanded and we painted them. The only trick is that the fronts are covered in glitter as well as paint. If I remember right, we used spray paint until they were sufficiently covered and then rolled on one coat and while it was wet, sprinkled on the glitter.

By the way, I have finally started working on my next project. It is a built-in desk for the nook in the kitchen. I'll be posting the work E and I did in the kitchen pretty soon so you'll be able to see the nook then.

Wednesday, August 09, 2006

Finished Coffee Table

The coffee table assembly was not particularly difficult. I just cut the wood down to size and rounded the corners slightly. I then used a drill press to drill the appropriate holes. Of course, hole placement is very important so I used a jig to help with that.

I bought the 1/4" polished aluminum from a metal place on I-45 but I had to buy a 12 foot piece and cut it down. I used a hack saw which was a nice workout. Of course, I then assembled the piece and stained it but I couldn't get the stain off of the aluminum so I had to cut four more pieces to replace the ruined ones. Oh well, lesson learned and the finished product looks great.

ottomanottoman

Sunday, July 30, 2006

Coffee Table Design

Once we had the ottomans built, we had to decide on a table design. E and I had talked about several but I had a real hard time picturing the one she liked most so I looked for drawing programs that would help. I stumbled on POV-Ray, a ray tracing program with which people can make some amazing images. I figured if people could make such incredibly realistic images, that I could pull off something representative of our table designs. Here are a couple of designs:

table design in POV-Raytable design in POV-Ray
Ottoman in POV-Ray

I don't remember but I think those may have been my designs which is why they are not as good as the final product. ;-) Of course, how could I possibly visualize the finished product without a simulated ottoman? Okay, at this point your thinking I have way too much time on my hands, which is not entirely untrue, but really it is not nearly as hard as it may look. I think I only spent a week or so working on POV-Ray, which is not bad considering I had never heard of it when I started.

Anyway, the final design is shown below with and without the ottomans. It was very helpful to have the 3D model of the table because not only did it help me see what E was talking about but it helped us tweak the design. Yes, believe it or not, it wasn't perfect from the start. For instance, I added the center piece so that it wouldn't just fall over. Also, we used the program to help us decide how thick the wood and aluminum rods should be. I'll talk about the construction and show you the finished project soon.

table design in POV-Raytable design in POV-Ray

Saturday, July 29, 2006

Ottomans

After a little distraction, it's time to get back to documenting my woodworking and home improvement projects. The one I'm going to start talking about today is the coffee table and ottomans that I built. Elizabeth had gotten this idea to build a glass-top coffee table with room for four ottomans to add more sitting room in our living room. She picked out the fabric she wanted to use early on but we hadn't settled on a table design. Since the ottomans were pretty much figured out and because I wanted to have them built before starting the table (for final dimensions), I went ahead and built the ottomans.

ottomanottoman

The boxes are made of 1x2 stock with 1/4" plywood sides and a 3/8" plywood top. I put this all together with brad nails, a hammer, and a nail set to countersink the nails. This wasn't too bad for the first box but after four, I really wished I had bought a nail gun. The legs are made from four pieces of 2x2 oak that I planed and glued to make a 3" leg. I then mitered angles and cut them to length to match our sofa legs (though smaller of course). These are fastened to the bottom with screws.

ottoman

Once the boxes were done, E took over. She cut and glued the padding, sewed and stapled the covers, and covered and attached the buttons. These were a lot of work but I think the results were worth it. I'll talk about the table design and show the results later.

Thursday, July 27, 2006

Syndication

I've updated the syndication for this page and for Elizabeth's ISU Blog. We are now using feedburner.com to provide additional feed services. I also added more options for subscribing in the sidebar. If you have already subscribed to the feeds on either of our sites, simply eliminate your previous link and use the new links provided in the sidebars of our blogs. Sorry for the trouble.

Sunday, July 23, 2006

Stylesheets

I have updated Taylored Truth, including the blogs, to support switching stylesheets. If you are using a capable browser like Mozilla Firefox, you can switch the style through the menus. I have also added links in the sidebar (of pages that have sidebars) to allow the switching. This setting will affect all pages you view at Taylored Truth including future visits, but you must have cookies enabled. I am still working on the Photo Album so it may be a few days before it reflects the updates.

Wednesday, July 19, 2006

Taylored Truth Updates

So it has been a while since I have posted but I am not just sitting around. I've been out of town for a few days and now I am working on updates to the web page. I guess that counts as a project of sorts. Anyway, I have already made a few changes that you might have noticed, particularly to fonts. I am trying to improve the readability of the site. The next step is to allow readers to select alternate stylesheets. This is primarily to help the readers who struggle reading the white text on a dark background.

As far as reporting on my other projects, I am currently in the planning stages of building a desk for the kitchen (to go in the breakfast nook). I may be in the planning stages for a while though because it is a big project and not easy to design. Of course, E has already set out the overall look, I just have to figure out how to make it happen.

I plan on continuing to update the site with descriptions of already completed projects. Next on the list are the ottomans and coffee table.

Wednesday, July 12, 2006

Kitchen Makeover: Part I

The only part of the house that Elizabeth really didn't like when we moved in was the kitchen. With the greens and whites, it definitely had a country feel (see before pictures below) and if you haven't been able to figure it out yet, our style is more contemporary. Anyway, I agreed that we could overhaul the kitchen and E set out designing. However, while she was deciding on a design, a few things had to change as a temporary fix.

before picture of breakfast nookbefore picture of kitchen

The most obvious change we made was the paint color. We painted most of the room a reddish orange color and the wayne's coating white. However, the more subtle changes actually make a big impact when your in the room.

after picture of breakfast nookafter picture of kitchen
As you can see, we took down the blinds and whatever you call that window covering and just left the windows open. We will probably put something back up eventually, but it actually isn't bad with nothing. I also replaced the lights over the sink and the kitchen table with recessed lighting. This was actually kind of fun because I got to use the reciprocating saw to cut the larger holes. I even had to cut out the old light fixture over the sink because I couldn't get to that part of the attic to remove the old mounting hardware.

The last two changes are that we painted the fluorescent light fixture and changed the plastic inserts. The surround was a natural wood color and the inserts were the standard textured type. The white makes it stand out less and we used inserts with a square pattern that is more contemporary looking. Lastly, we replaced the wall plates with brushed metal plates.

This is how our kitchen looked for a while before E finalized her designs and we made the big changes. I'll have details on those soon.

Thursday, July 06, 2006

Need a nap? Make a bed.

Well, this seems like an appropriate time to write about the bed that I built. I am supporting the STS-121 Shuttle flight by providing engineering and analysis support for my company's Laser Camera System which is being used for on-orbit inspection of the Space Shuttle. Unfortunately, my shift is from 2:30 am to 11:30 am, so I am pretty tired right now and could use a nice bed to lay down in...

This project was my first real woodworking project as well as part of my motivation to pick up the hobby. E and I knew we would need a new bed when we moved into the house and we had found some beds we liked but they were all extremely expensive dispite being quite simple in design...so I said "I can make that" and a hobby was born. The bed is a pretty simple platform made from pine stock with stained oak on the finished surfaces. The pictures below show the platform and what it looks like with the bed made (it seems this picture was taken before the last board was attached so ignore the little gap).

picture of platform bed framepicture of (almost) complete platform bed
T-slot used to hide bed bolts
The basic form is pretty simple with 2x6 pine creating a frame including a middle beam for support and 1x4 pine used for the slats. The slats are held in place by slots routed in the ends of the boards and dowels embedded in the side pieces (there are some detail photos in the projects photo album). The thing that makes the project interesting is that I wanted to be able to take it apart but I didn't want exposed screws or bolts so I created T-slots (see right). By using these slots and embedding the nut in the footboard, I was able to hide the fasteners but maintain the ability to dismantle the bed in the future.

Sunday, July 02, 2006

Painting: Part 2

By February 2005, we completed three more painting projects. The kitchen will be shown in a later post, but I will show the other two here. I'll start with the guest bedroom; we basically just wanted to add some more color. Have a look at the before and after below.guest bedroom picture before paintingguest bedroom picture after painting
The other painting job was in the front of the house. If you recall from my first post, the front of the house was pretty bland with gray paint in the entry along with the gray brick. Elizabeth and I tried to make it stand out a little by painting the entry white, the door red, and the trim black as you can see in the following two pictures.picture of house frontpicture of front entry
I think it turned out pretty good. I'm not sure we will leave the black trim forever and the door really needs to be replaced but I know E likes the red color for the door. Also, I really should replace that light fixture and the door hardware, but that is for another day.

Thursday, June 29, 2006

Painting

What's the first project that we undertook when we moved into the new house? Painting...and lot's of it. Most of the house was a neutral light tan color, so we wanted to add some color. We painted the living room / dining room, computer room, and master bedroom in the 3 days after we closed but before we moved our furniture. Below are a before and after of the fireplace in the living room (E also made the curtains shortly after we moved in).
living room picture before paintingliving room picture after paintingcomputer room picture before painting
The biggest change though was in the computer room where there was a mural that we painted over (see before image at right). We started with a bright yellow that ended up being too bright (sorry no pic) so shortly after we moved in, Elizabeth painstakingly taped and repainted to get the results you see in the two images below. Of course, she also recovered the futon which used to be a dingy white.
computer room picture after painting (1)computer room picture after painting (2)

Thursday, June 22, 2006

New Home!

picture of our home
Okay, so it isn't all that new. In fact, E and I bought the house in September 2004. However, this is a new blog so I figured I might as well start from the beginning. I'm not going to talk about any projects right now but I wanted to introduce the house where most of the projects take place. If you want to cheat, you can check out a lot of my project results in the projects album.