Sunday, September 17, 2006

Kitchen Shelves

S wall shelves

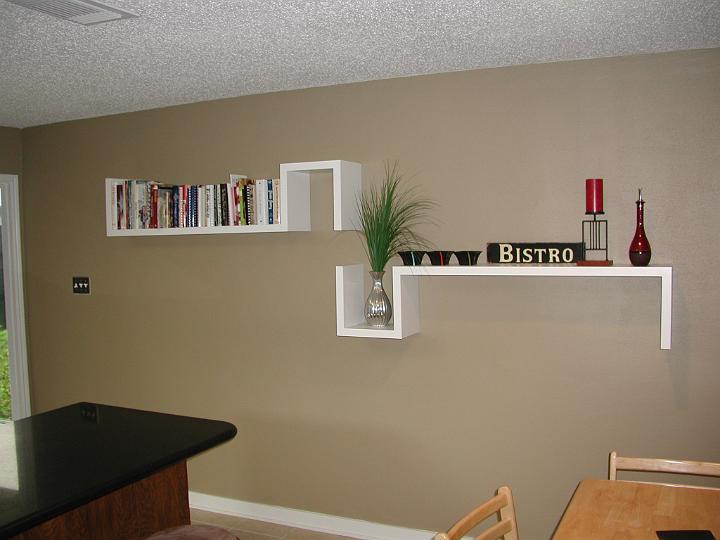
What do you do with a really long blank wall in a kitchen? How about wall shelves. But not just any wall shelves...fancy, large, funky, creative, 'S' shaped wall shelves. Though not a completely original design, these shelves are yet another brilliantly functional and attractive design from my lovely wife.

As far as design, I think the pictures say all there is to say and, in fact, there is not that much to say about the implementation either. The shelves are made from glued up 3/4" MDF to produce a thickness of 1 1/2". The total length is 5ft and stud positioning was taken into account during design to guarantee plenty of support for the relative heft of that much MDF. These shelves are very secure due to the mounting method I chose. Basically, I created a copy of the shelves out of solid 1x2 wood and fastened the copy to the studs with screws. The shelf pieces were dadoed to fit over the 1x2 copy and a couple of screws through the top of the shelf attach them together.

This is all part of a master plan that will include some more decorative work on the wall and a wine rack. I'll be working on that after I finish the desk. Speaking of the desk, for the first time I will try to keep the blog up-to-date with progress instead of just giving updates upon completion so look forward to that.

Sunday, September 03, 2006

Kitchen Makeover: Part III

complete cooking area

It is easy to forget exactly how much work we have done in the kitchen until I start trying to document it all. We left off with the countertops having just been put in. After that, we had professional tile layers come in and put up the backsplash. We, also, added knobs and handles to the cabinetry and painted the walls in a tan color. With these changes, the cooking area of the kitchen was mostly complete.

Next, attention was focused on the long wall with the wayne's coat. We pulled the wayne's coat off but it had been attached with liquid nails so it tore up the drywall. After about a week of E and I both trying to fix the dry wall and match the existing texture, we finally gave up and had painters come in. They were smarter and smoothed the whole wall and then retextured instead of trying to match the existing texture.

baseboard

Lastly, we put in new baseboard. Because the tile had been installed after the wayne's coat, the baseboard had to be pretty thick to cover the gap. As you can see, we just used a very simple design. We also, put it under the cabinets and just the small piece of baseboard around the back side of the island. Putting it under the cabinets meant it needed to go in front of the dishwasher base. This is a problem because the dishwasher sticks out a little and because I didn't want to have to remove the baseboard to get to the dishwasher. I solved this by attaching a piece of baseboard to the dishwasher with magnets. It stands out a little , but is hardly noticeable in person.

That pretty much wraps up the major changes to the kitchen itself. There are a lot more pictures in the house album. I've since added some shelves to the long wall that I'll write about next and I am currently building a desk to go in the breakfast nook. There will be plenty of time to write about that because there is still much left to do.